
Catlantean 3D is a side-project I’ve been slowly building in my spare time for over a year, and I intend to release it on Steam next year.
My goal was to build a complete, shippable first-person shooter using techniques that were common in the early 90s, while allowing myself the luxury of using a modern compiler and a platform abstraction layer.
What this actually means is, the constraints I have foolishly imposed upon myself are as follows:
- game must be made entirely from scratch, including the assets
- all rendering must be done by hand
- all sound mixing must be done by hand
- 320×240 target resolution
- 256 colors only
- floating point allowed, but behavior must be consistent across platforms
- decided on fixed point for game logic to guarantee deterministic behavior, floating point for rendering because determinism isn’t that important there
- must be a finished, polished game that is fun to play (not a tech-demo)
- platform abstraction layer allowed, but I must pretend it’s very limited (within reason):
- frame buffer to write pixels into
- keyboard/mouse input
- audio buffer to write samples into
- filesystem I/O
- no AI slop
If this sounds unreasonable to you, that is because it is.
But I’m doing it anyway, and today I’m gonna talk about something that is typically overlooked in development blogs, and that is asset creation.
Note: Everything displayed here is work-in-progress, and heavily subject to change.
VGA Graphics
Mode 13h on VGA hardware was the famous 320×200 256-color graphics mode that defined a generation of PC games. From a programmer’s perspective it was wonderfully simple: you’d have a linear frame buffer where each pixel was represented by a single byte indexing into a palette of 256 colors.
If you wanted to draw a pixel, you wrote a byte at a specific address, and that was it, there were no shaders or VRAM, or anything like that.
One byte per pixel, and that byte is an index into a palette which contains actual RGB values that would be rendered to screen. This imposes some interesting limitations; when making assets for modern games, you can throw millions of colors at an image, but when your limitation is that every pixel on screen can only be one of 256 colors, asset creation becomes a very different problem because every color choice has to be careful and deliberate.
Games like Doom and Duke Nukem are good examples of this done right. There is a certain crispiness and clarity to these graphics that arises because of these technical limitations, not in spite of them. Restriction forces deliberate choices, and deliberate choices tend to look good.
Catlantean 3D is an attempt to reproduce that feeling, but with one caveat – I’m actually going for something closer to VGA Mode-X, which is 320×240. The reason for this is, if you display 320×200 on a 4:3 display, you end up with non-square pixels! While this would be most authentic, I’ve chosen not to deal with this out of preference rather than objective reason.
So how does one create graphics that work within these limits?
The Palette
Everything begins with 768 bytes, carefully picked through many iterations of trial and error.
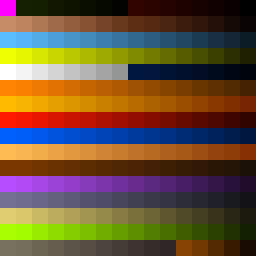
The main reasoning for picking these exact colors was the following:
- one reserved for transparency (the vibrant pink)
- one reserved for pure white
- one reserved for pure black
- I was obviously going to need a lot of blood, thus reds
- shades of green and blue because I was going to have red, green and blue keys and color-coded doors
- game would be set in Catlantis, which is a parody land that resembles ancient Egypt (because cat worship), so obviously, a lot of desert hues (yellows and browns)
- lots of grays because the setting involves many technical installations (Catlantis is under occupation by cybernetic dog-men)
- some beige hues to break up monotony over grays, and to serve as warmer replacements when darkening (more on this later)
- the rest would be filled as necessary when creating textures – highly subjective and impossible to explain, other than “it looked right”
The palette did not spring into life all at once; it involved a lot of back-and-forth during asset creation, testing, and re-iterating in general.
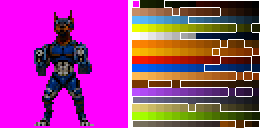
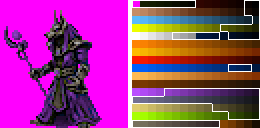
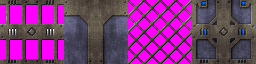
Below are some examples of sprites and textures from the actual game:

The Colormap
Catlantean 3D is a traditional raycaster. The map consists of tiles which are all identical in size; some are walls, others are just voids with a floor and ceiling. In order to render the map, the renderer uses the DDA algorithm for each column of screen, traversing the tilemap and determining where it hits the map geometry, and based on this, a wall column is rendered on screen with the appropriate texture, sampled from appropriate coordinates. Floors and ceilings are rendered after as horizontal scanlines, filling in the rest of the screen.
Raycasting has been done to death by other blogs and websites, so I’m not going to cover all of it, but I do want to cover what I think is its most overlooked aspect: lighting.
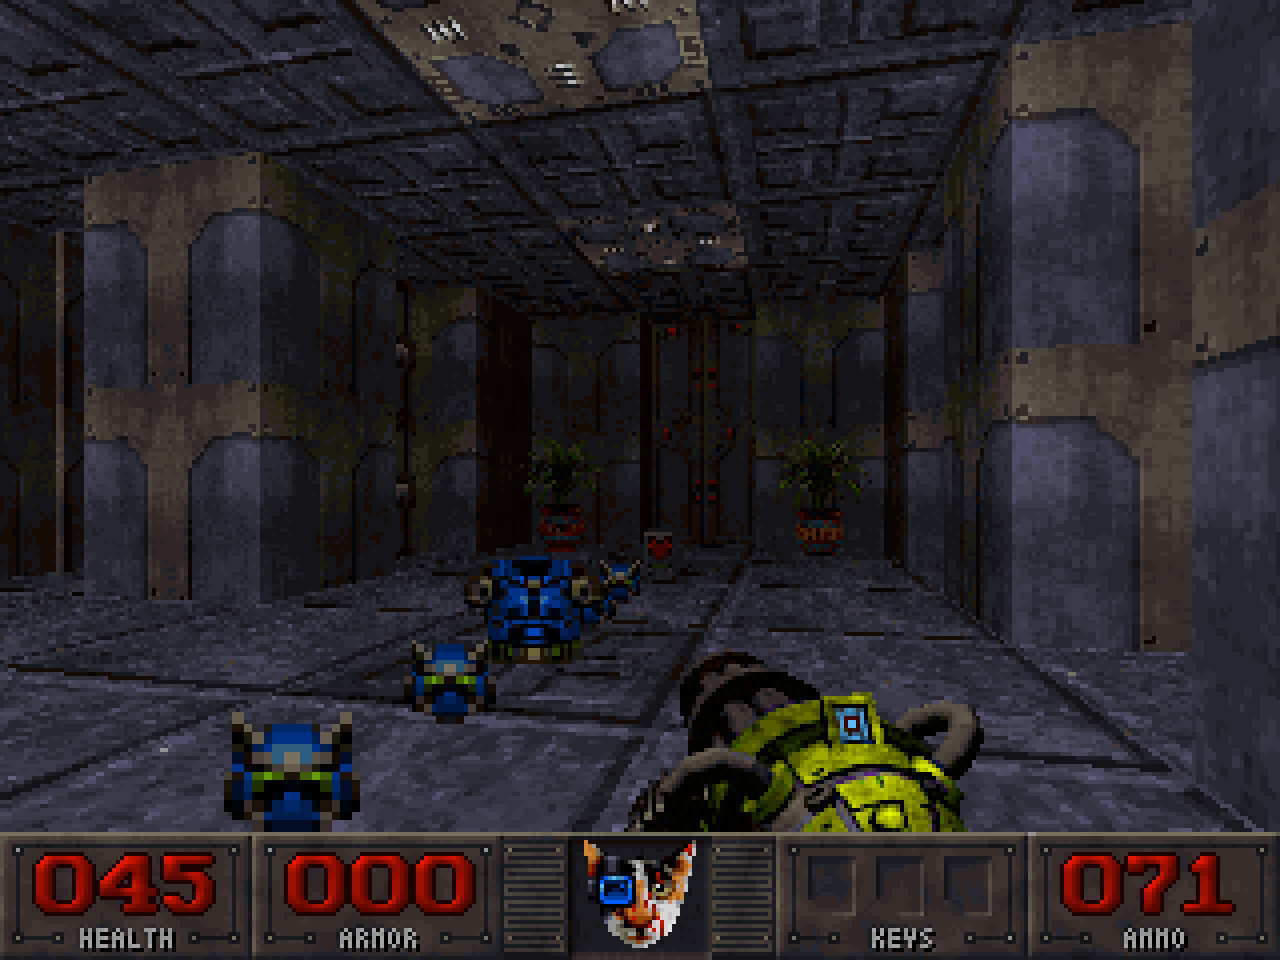
If we were to render the game world using just the palette, without any special effects, we would end up with something that looked rather flat and unimpressive:
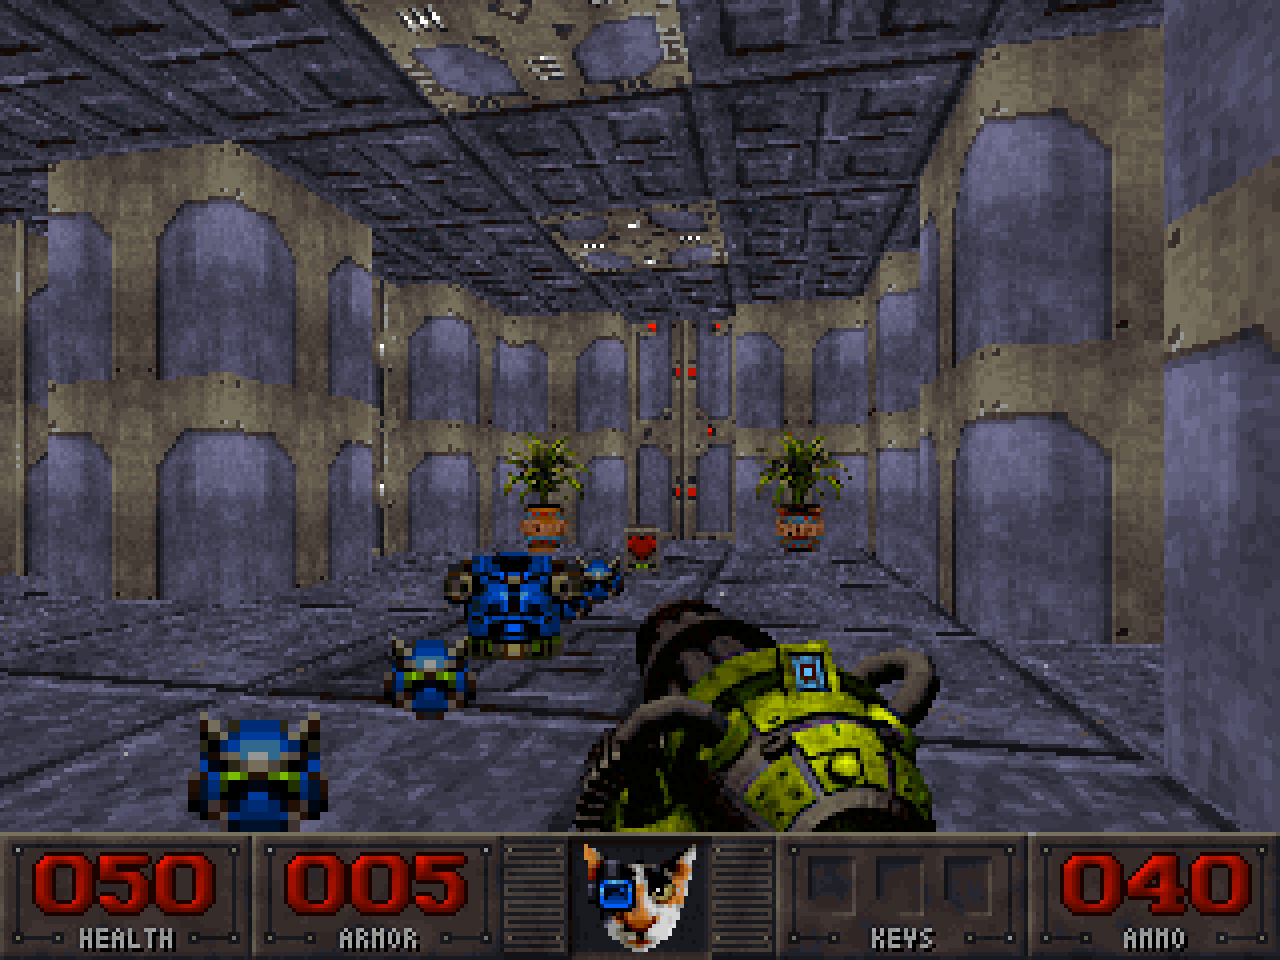
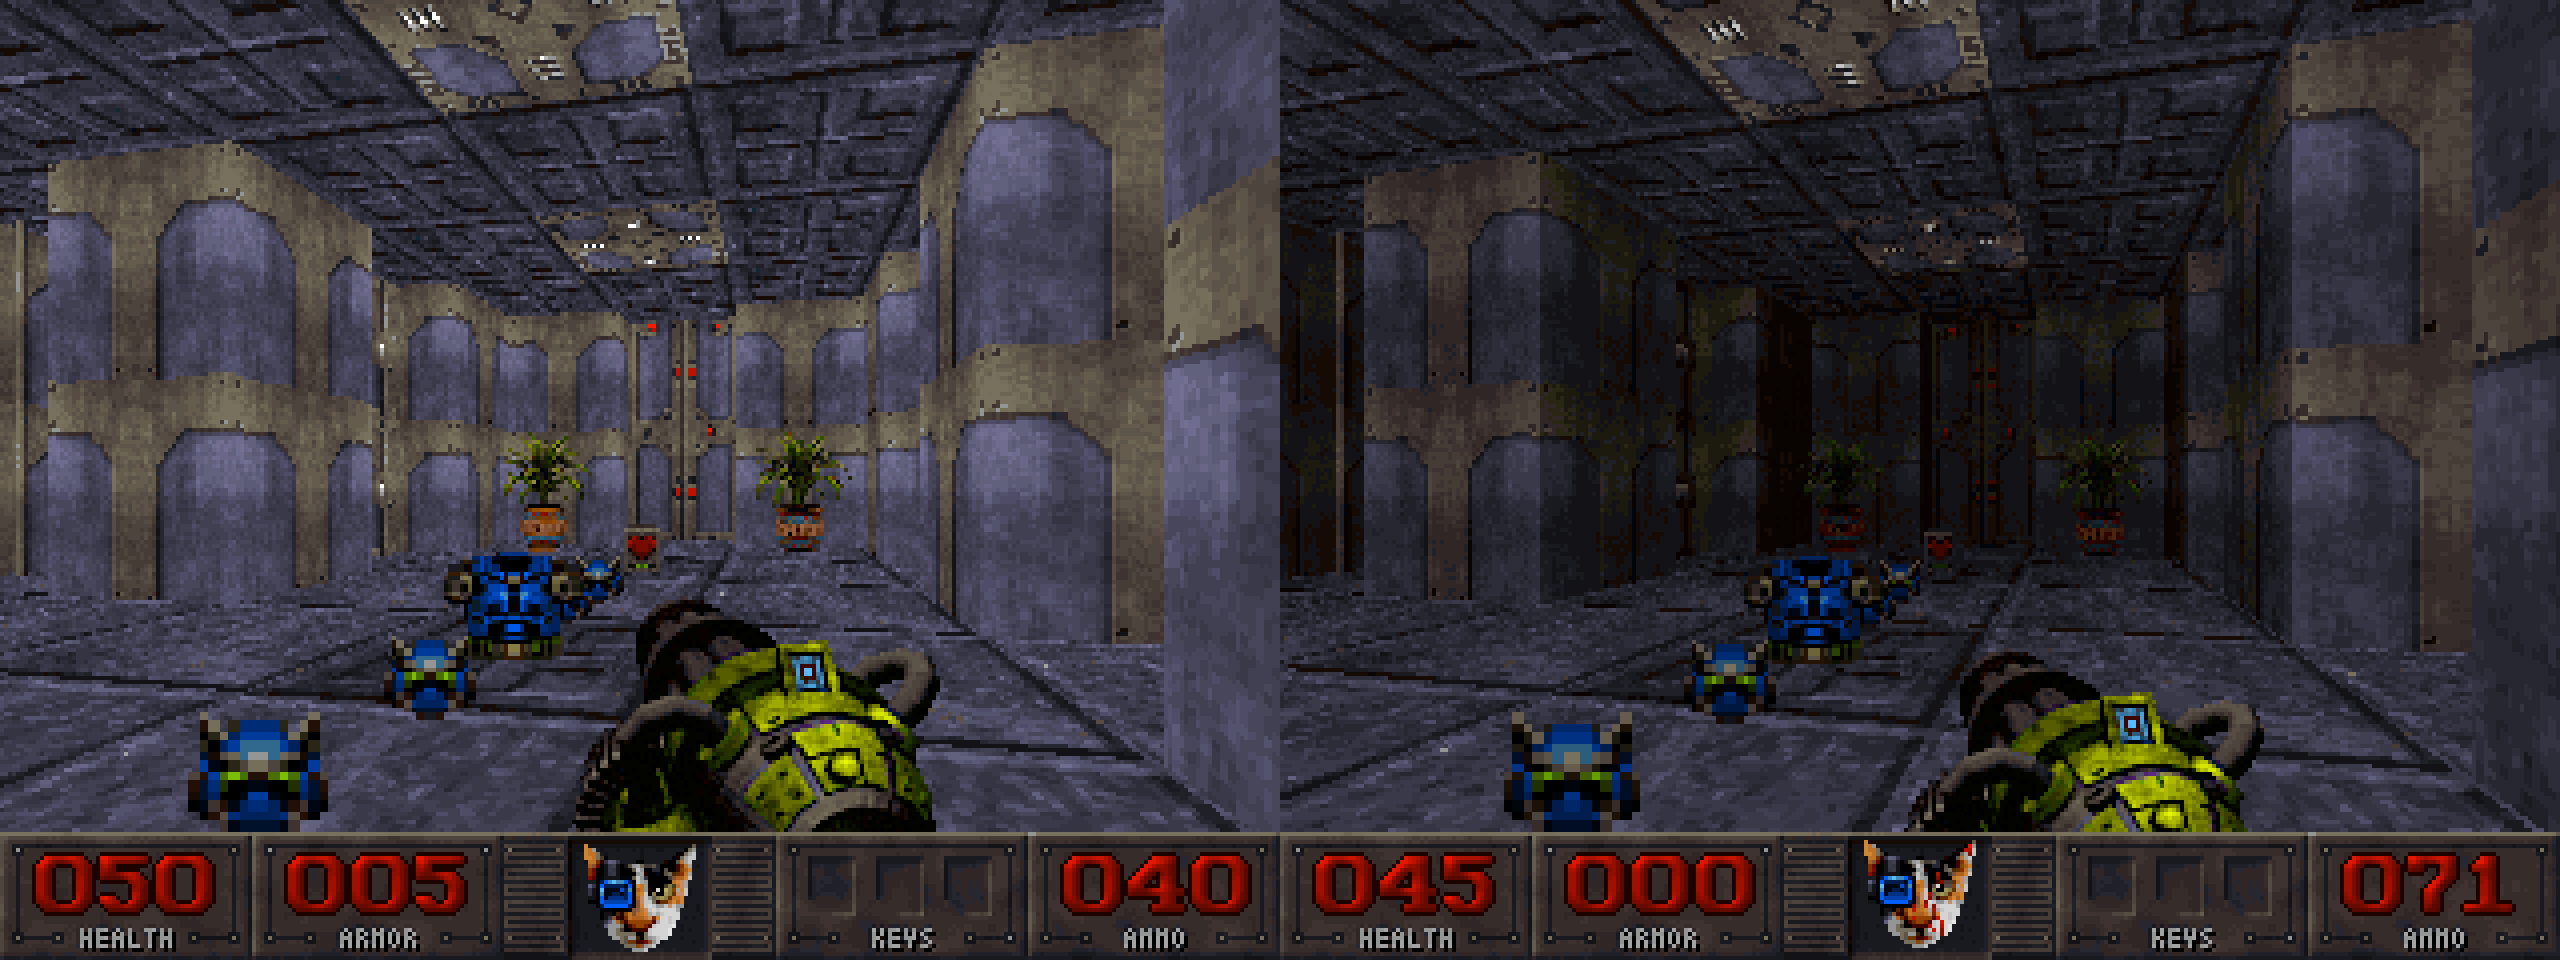
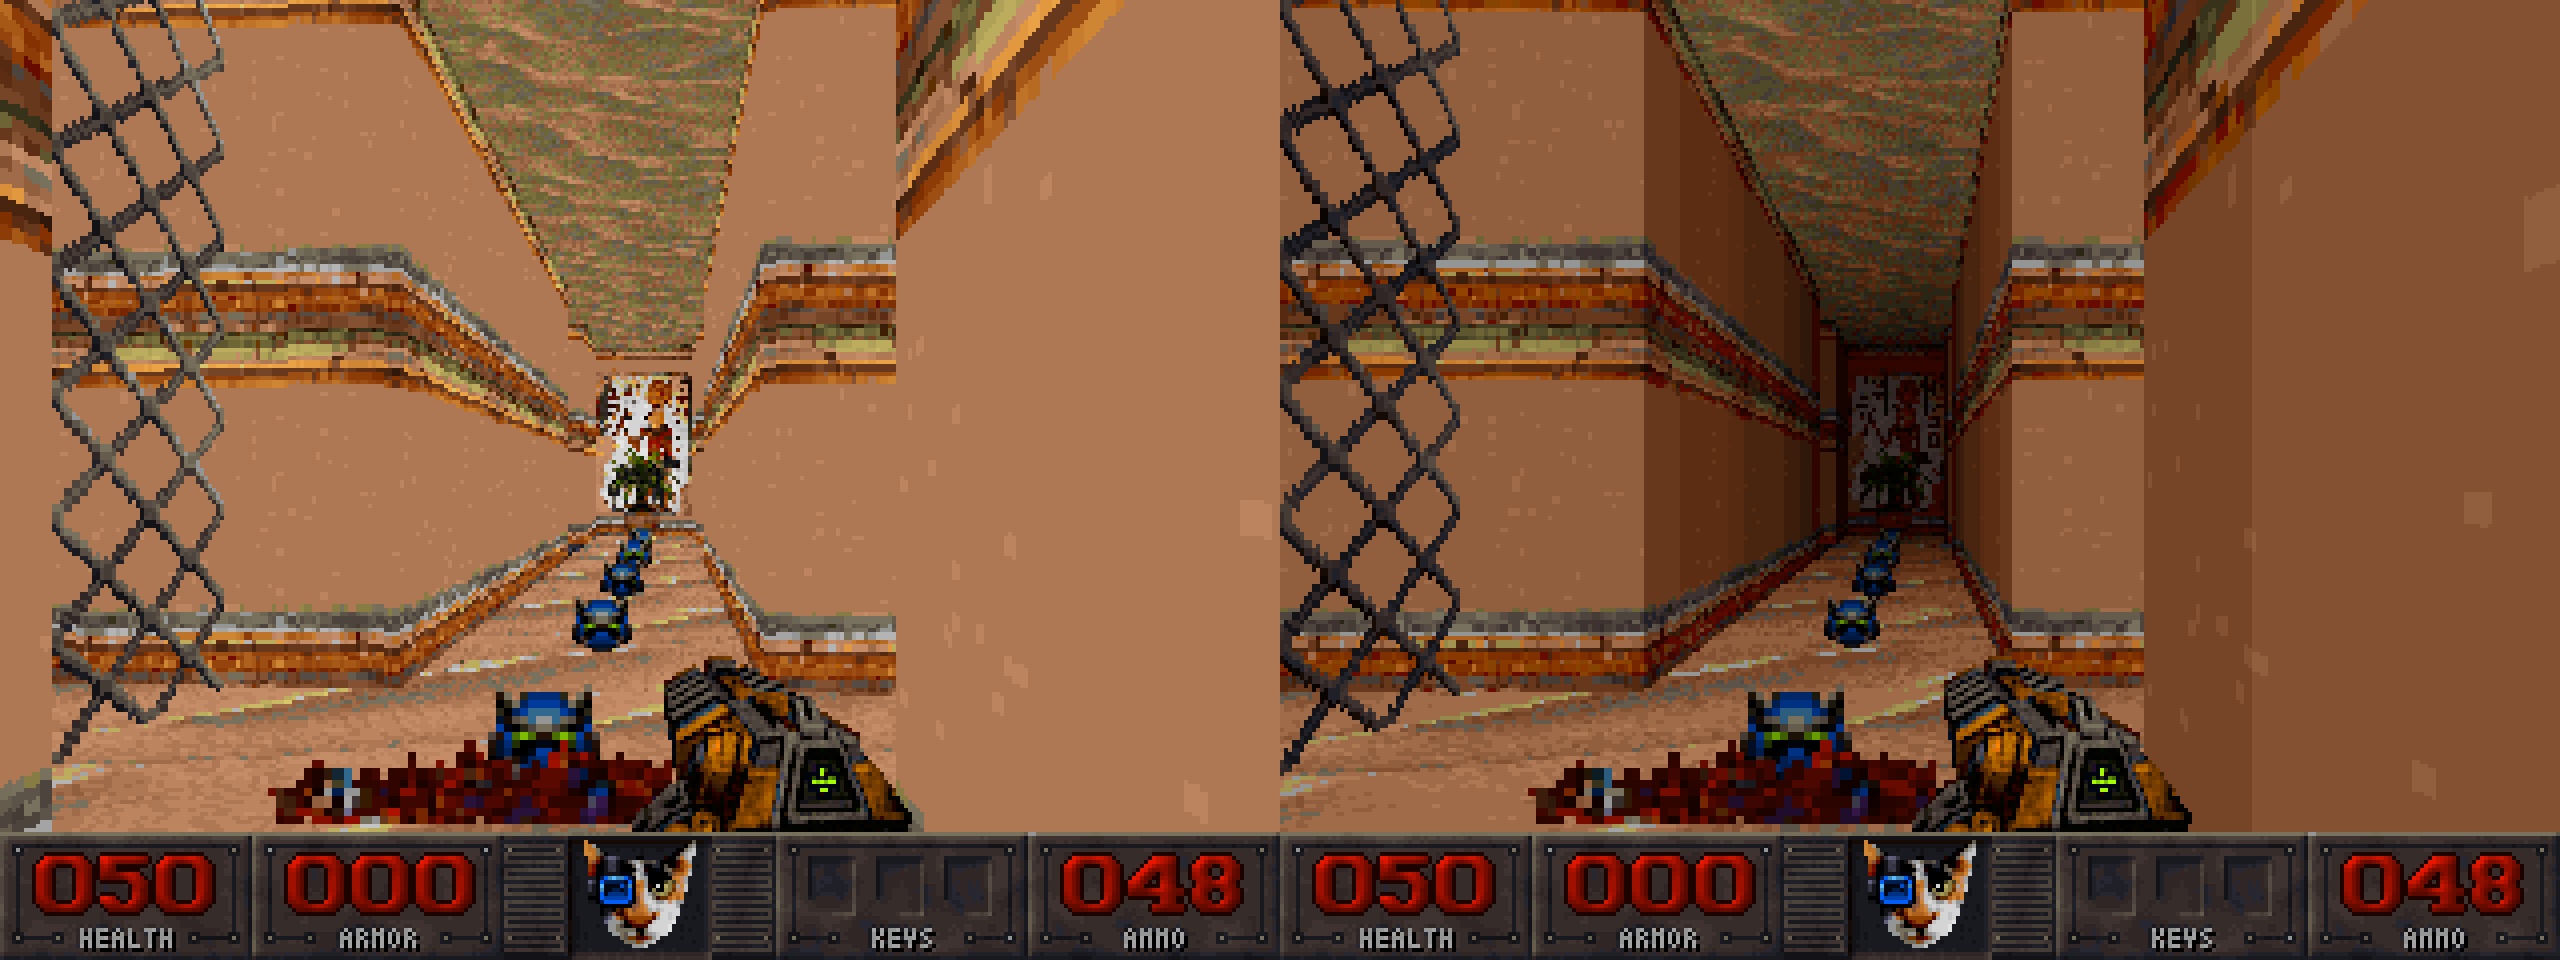
But what we wanted was the following. Notice how the light diminishes the further away geometry is from player, and how one side of the map tiles is just slightly darker than the other. This gives an impression of depth.
With a modern hardware-accelerated renderer, this would be trivially done in a shader – based on how far the vertex is, we would multiply its color vector by a floating point factor and get a diminished color vector as a result.
But how do we achieve something like this with a palette renderer? It has no concept of color, just indices into palette. So if we wanted to find a darker shade of a certain color, we would need to loop through the palette and find the color that meets our criteria of “darker”. This is just too much because we can’t loop through the entire palette for every pixel we render onto the screen, it would be too slow.
What we could do instead was some preprocessing, to allow a fast color lookup based on distance at runtime.
If we were to lay out our palette into a single row like this…

We then choose the number of shade levels (32 in my case) meaning each color needs 31 darker variants, all sourced from the palette. We know each color’s RGB values, so from this, and the shade index we can determine the closest target color of that shade:
// First shade index (0) is original color.
float darkening_factor = (32 - shade_index) / 32.0f;
target_darker_color.r = current_color.r * darkening_factor;
target_darker_color.g = current_color.g * darkening_factor;
target_darker_color.b = current_color.b * darkening_factor;
But that color might not exist in the palette. So we need to loop through the palette and find the closest color to it.
Definition of “close” actually changed for me during development – at first, I just took euclidean distance as a measure, but the problem with that was that almost everything had a tendency to gravitate towards the greys, simply due to the mathematics. Some older games actually did use Euclidean distance, but to me this didn’t look very good. I can’t explain why exactly, but a lot of darker shades appeared somewhat cold and lifeless. So instead, I converted my colors to Oklab color space, and leveraged its perceptual distance formula, which is closer to how humans perceive color differences. I also apply a small shift towards warmer hues the darker the color is (a common concept in pixel art called “hue shifting”). This is typically not necessary, but it does make the game look just a bit better.
How do I define “better” in this case? I have no idea, it just looks right. Frustrating, isn’t it? It’s hard to rationalize something subjective.
Back to our algorithm…
Essentially, for each color, we create a column that represents the shades of that color. What we end up with is a 2D matrix of palette indices called the colormap. Note that the colormap gradients are imperfect, because we’re still restricted to colors from the palette:

So now, determining a darker shade of color N based on distance becomes trivial.
Given colormap row index (i.e. shade level) based on distance:
colormap_row = 32 * fragment_distance / view_distance
We pick N-th entry in row belonging to that shade – that is the palette index of the darkened color N.
And voila, O(1).
Also, instead of calculating the colormap row index for every pixel, the cost is further reduced by performing calculation:
- only once per screen column when rendering walls, because they’re perfectly vertical, so every pixel in column has same distance from camera
- only once per screen row when rendering floors, because they’re perfectly horizontal, so every pixel in row has same distance from camera
- only once per sprite because they are perfectly flat billboards where every pixel has the same distance from camera
So we’re doing colormap row index calculation 320 times for walls, at most 240 times for floors, and once per visible sprite (raycasting gives free occlusion culling). That is cheap, and the payoff is great.
Doom and many other titles used similar approaches.
Textures and sprites in Catlantean 3D fall into three categories:
- Pre-rendered sprites – 3D models created in Blender and rendered to textures
- Hand-drawn sprites and textures
- Procedurally generated textures – generated via special Python scripts by combining hand-drawn art
Pre-rendered Sprites
I am working a full-time job and have a decently active life, so my time to work on the game is limited. Thus, I wanted to minimize the time I spend reiterating when making complex sprites that involve animations. I rarely get something right on the first attempt, so naturally, reiteration is expected, and it is hard to reiterate when you need to make changes to many frames of an animation.
The more efficient approach was to create sprites in Blender as 3D models, rig and animate them there, and then render them to a series of textures with special Python scripts that leverage Blender’s Python API. Reiteration then involved making changes in the model, and the rendering scripts did the rest, which was a lot of time saved.
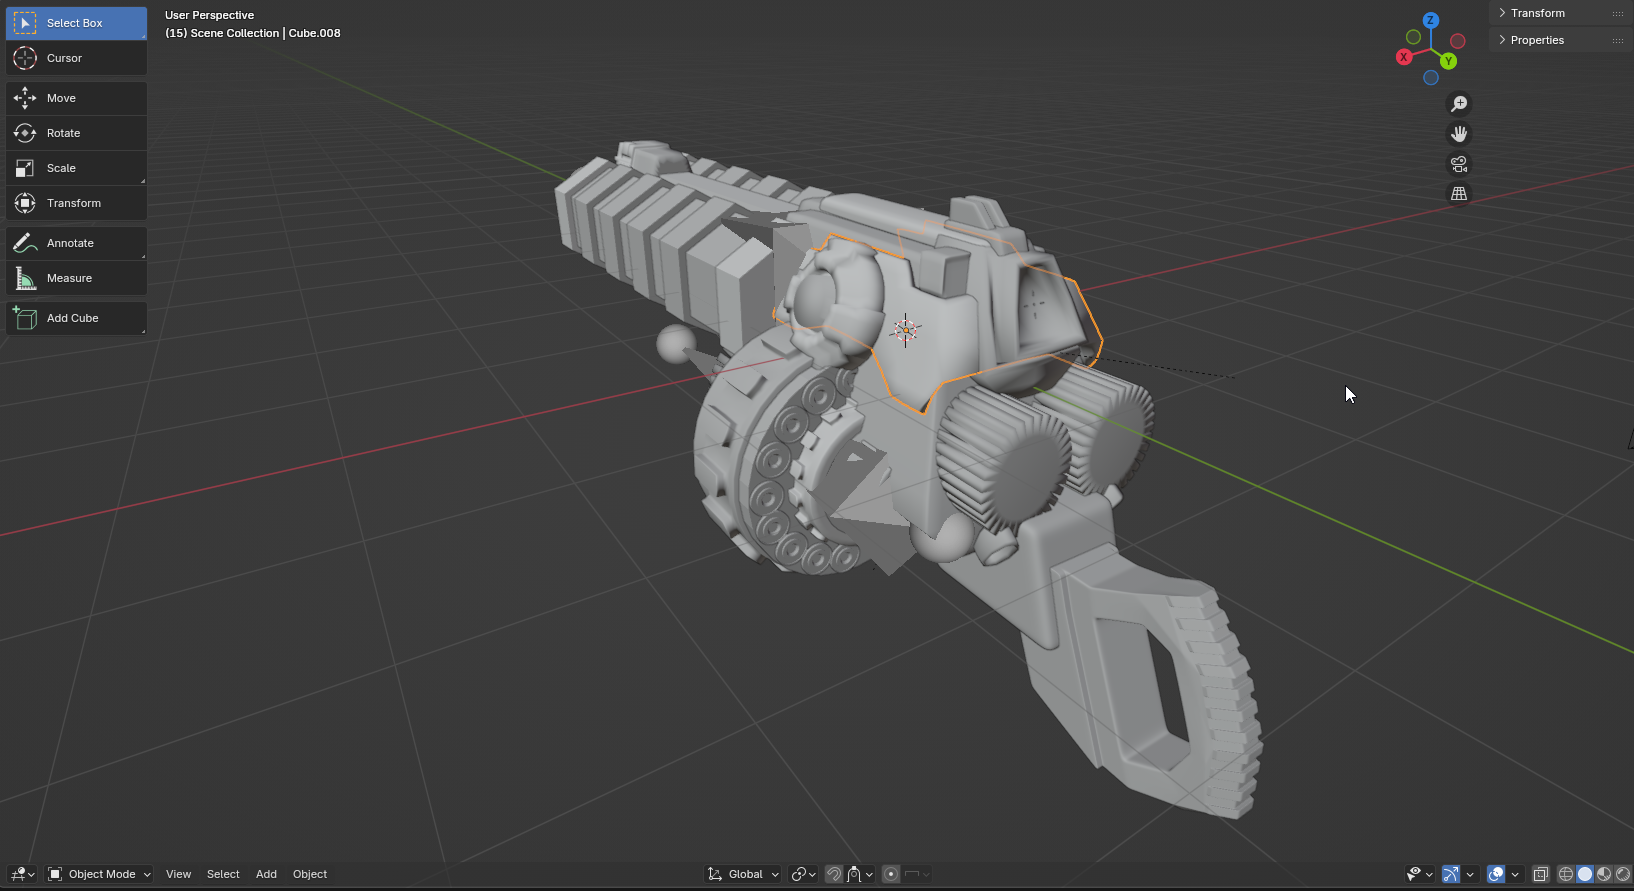
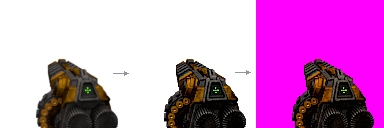
The main hurdle was that rendered sprites came out very blurry and washed out.
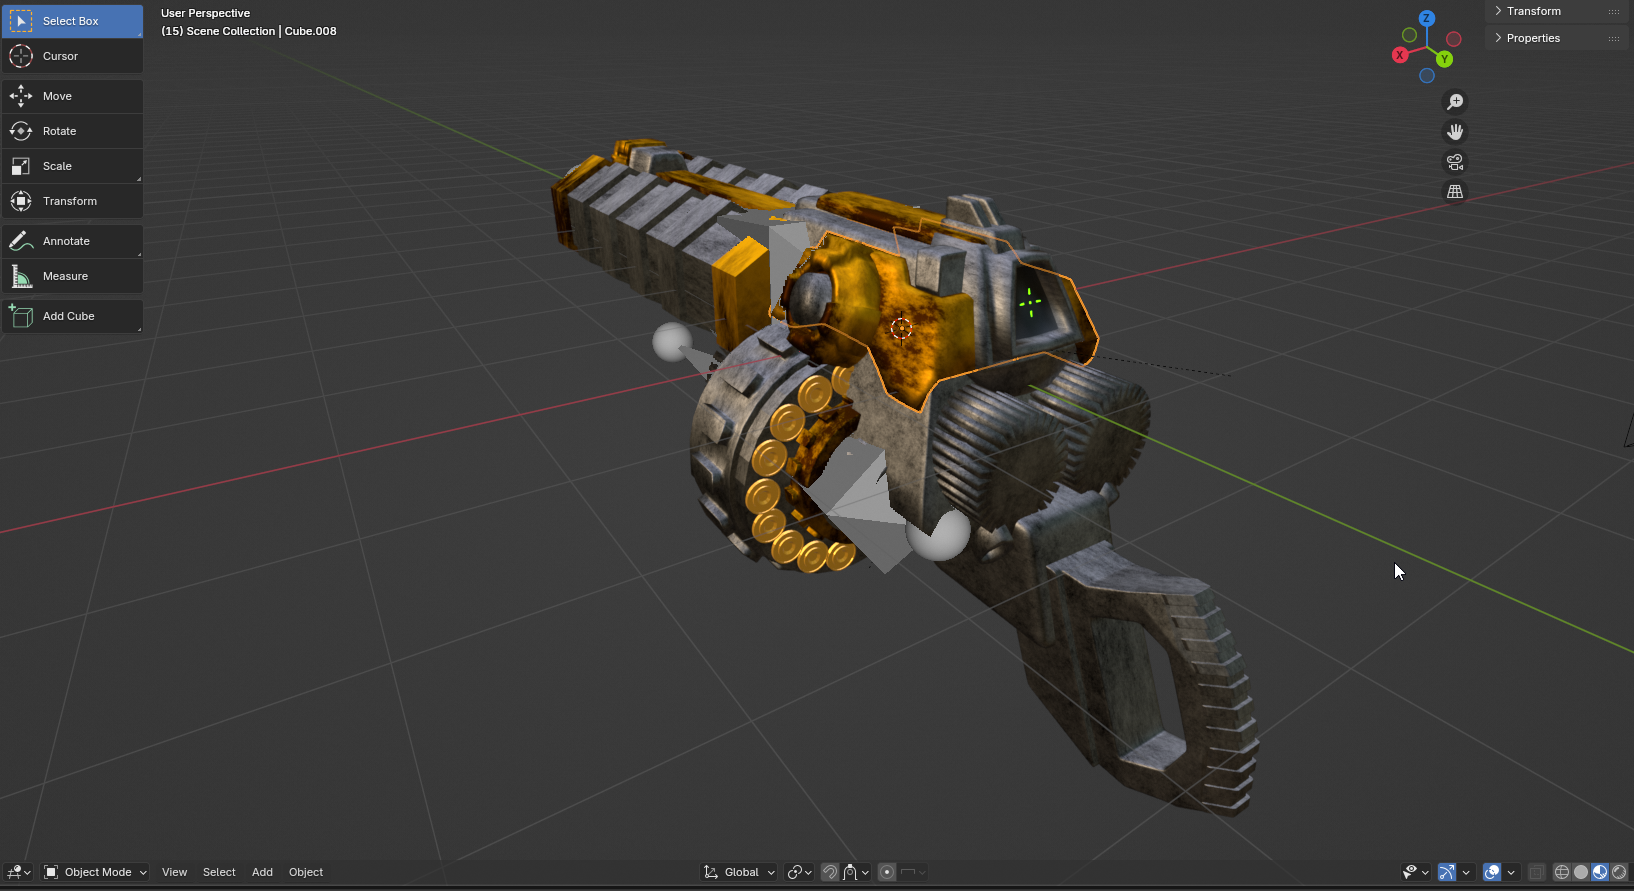
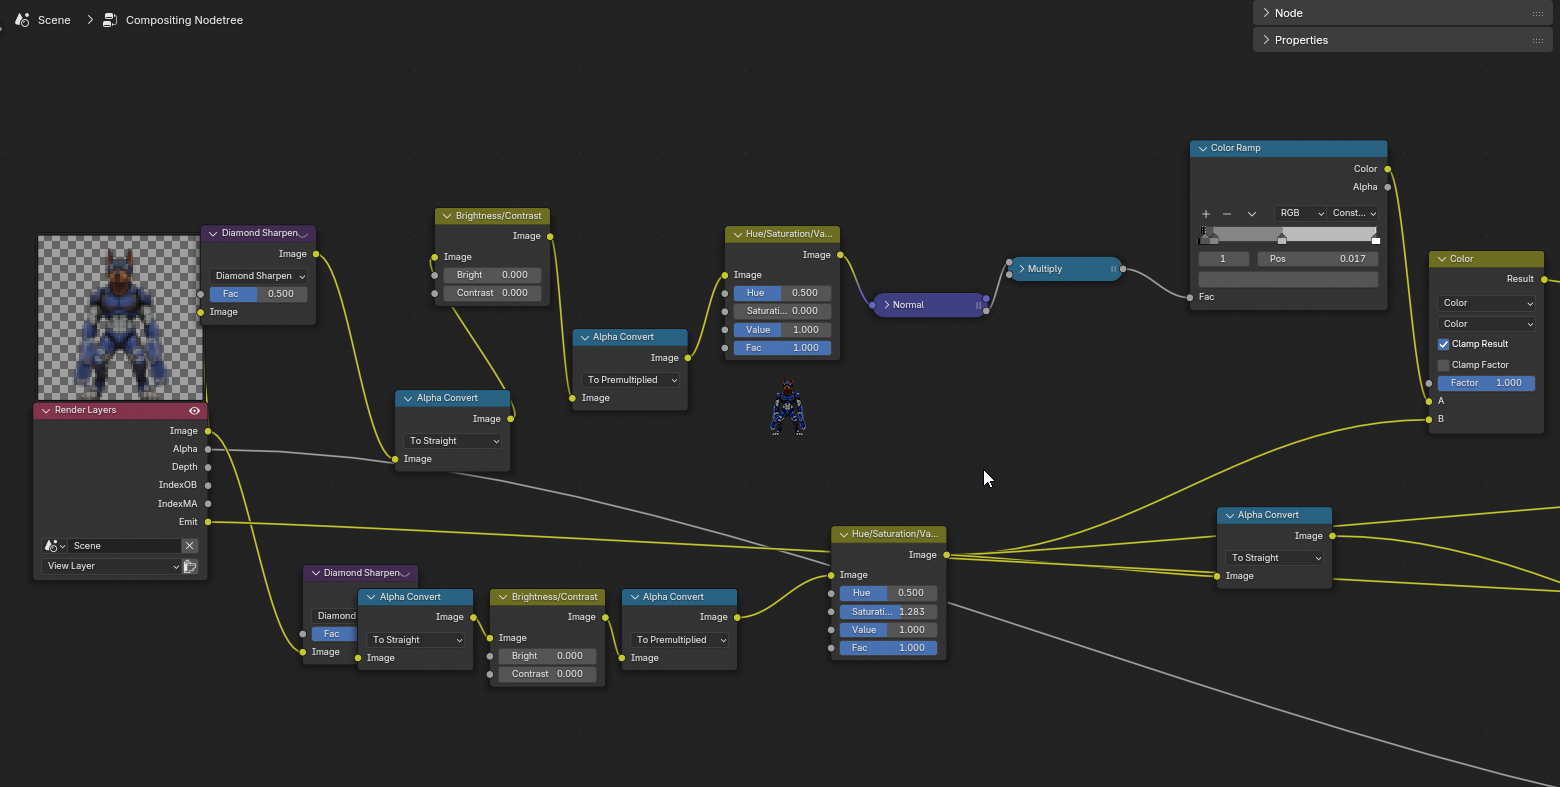
One might think that the obvious answer to this was to render the sprite in high resolution, and then downscale with filtering, but I’ve had mixed success with this; details would often be suppressed by filtering, and edge clarity would be lost. What I found to be the most effective and reusable was to leverage Blender’s compositing functionality to get the right amount of contrast and clarity:
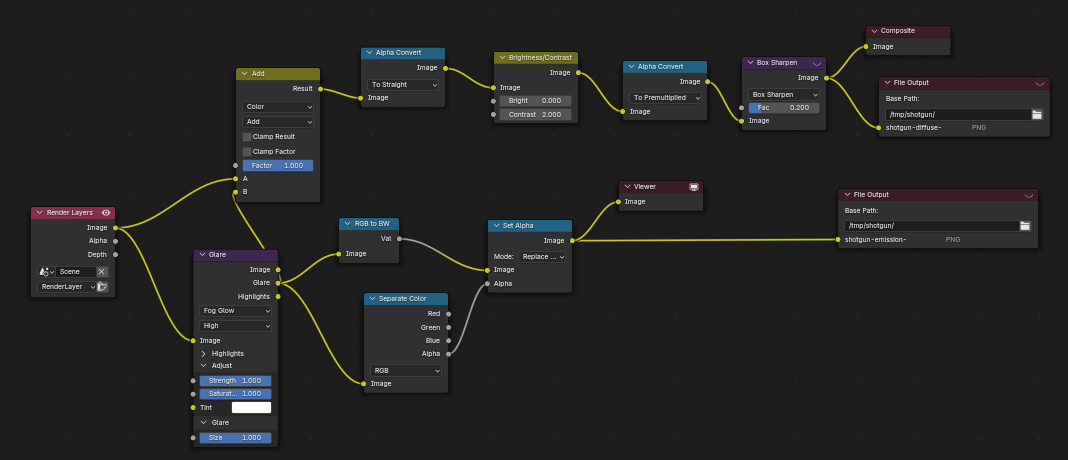
Once the image was ready, it would be sent through a special Python script which performed palette quantization, creating a 1-byte-per-pixel image used by the engine. For every pixel in the source image, the script finds the closest color in our palette (perceptually closest – Oklab), and uses the index of that color for that pixel. The index array, along with the dimensions, is then packed into the very simple TEX format that is used by the game.
A similar workflow was used for enemy sprites. Note: some of these nodes are either redundant, or plain useless, simply because I had used them at some point, and then changed my mind. I like leaving them in just in case I need them again.

Enemy sprites are rendered in a special way. Sprite can have multiple animations, and each animation must have frames for each of the 8 directions sprite can face. So, for every animation (walk, fire, die, etc.), the Python script that uses Blender’s API rotates the sprite, renders all frames of an animation, rotates the sprite again, and so on. Sprites are saved with a special convention that denotes sprite name, action name, direction and frame index:
![]()
Nice thing about this approach is that I don’t need to keep rendered sprites in the repository – they’re actually .gitignored. Whenever I switch locations and use another computer, I simply run the compilation script which renders every model and produces the sprites. It is reasonably fast and runs in ~10 seconds for about 15 models on RTX 3070.
Hand-drawn Sprites and Textures
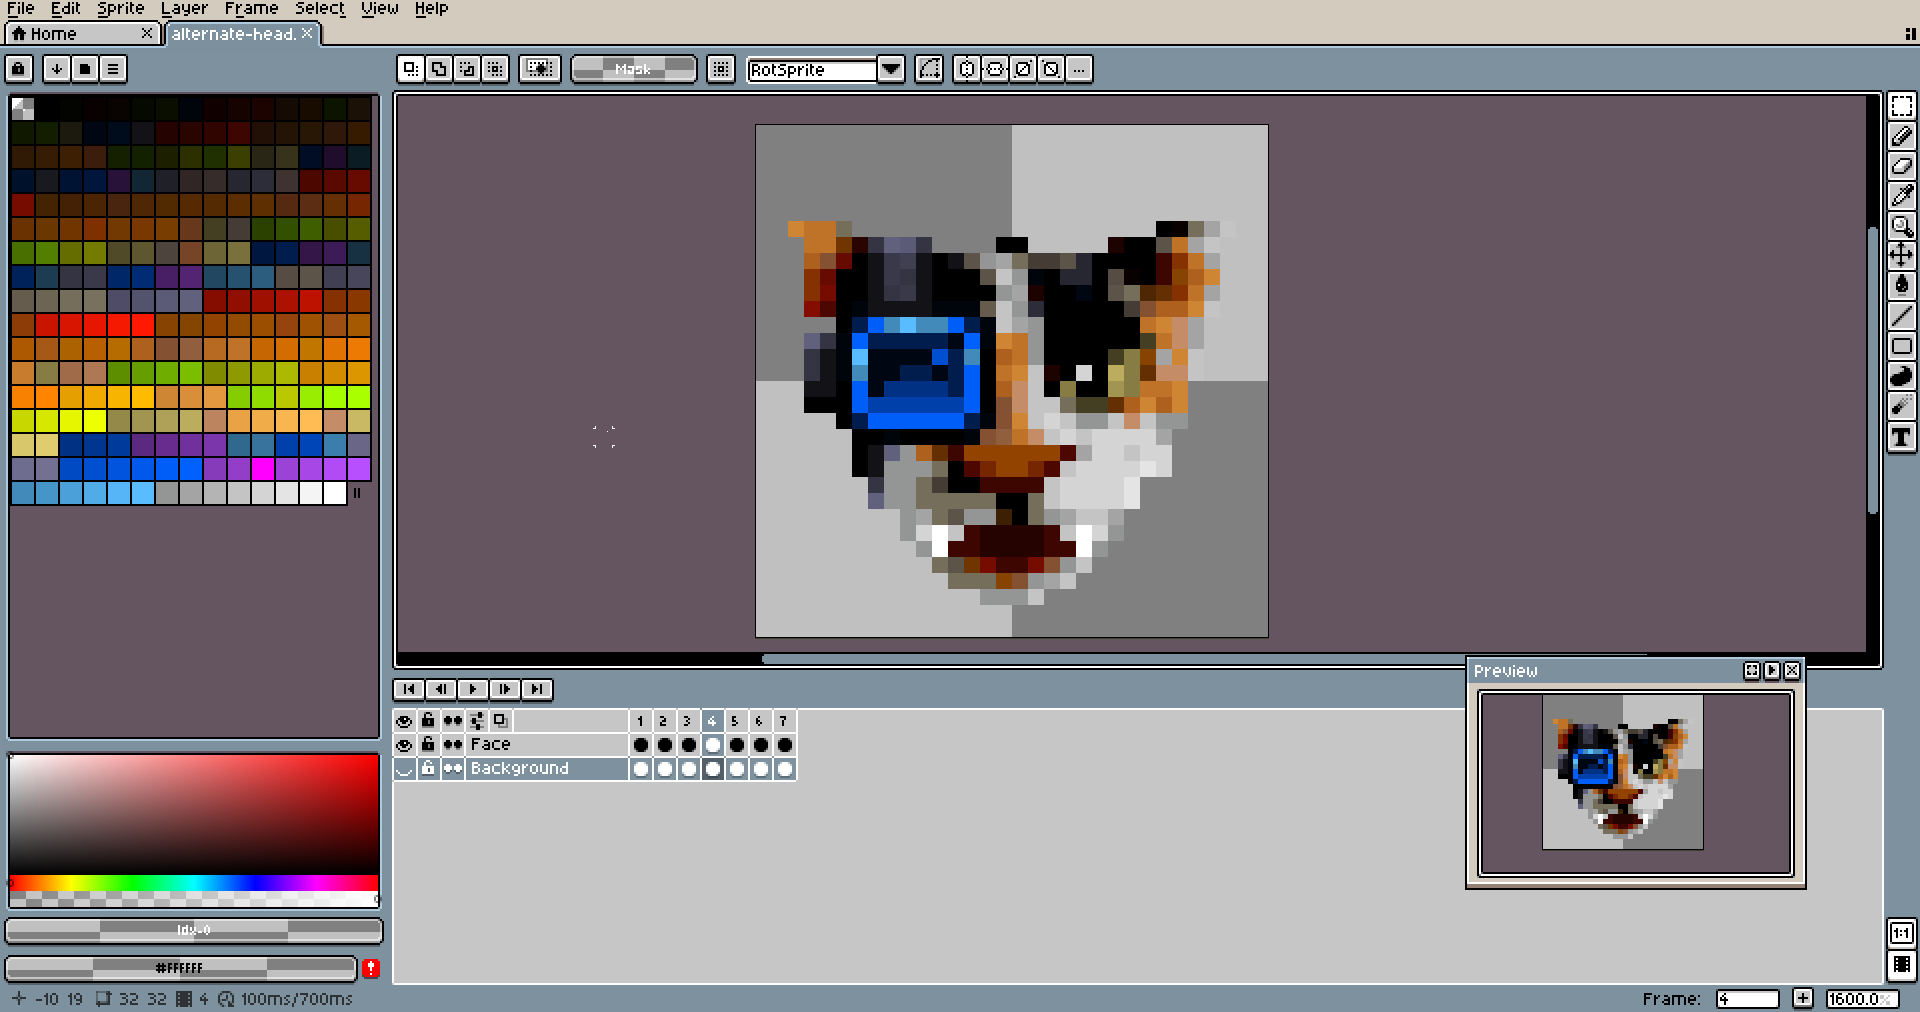
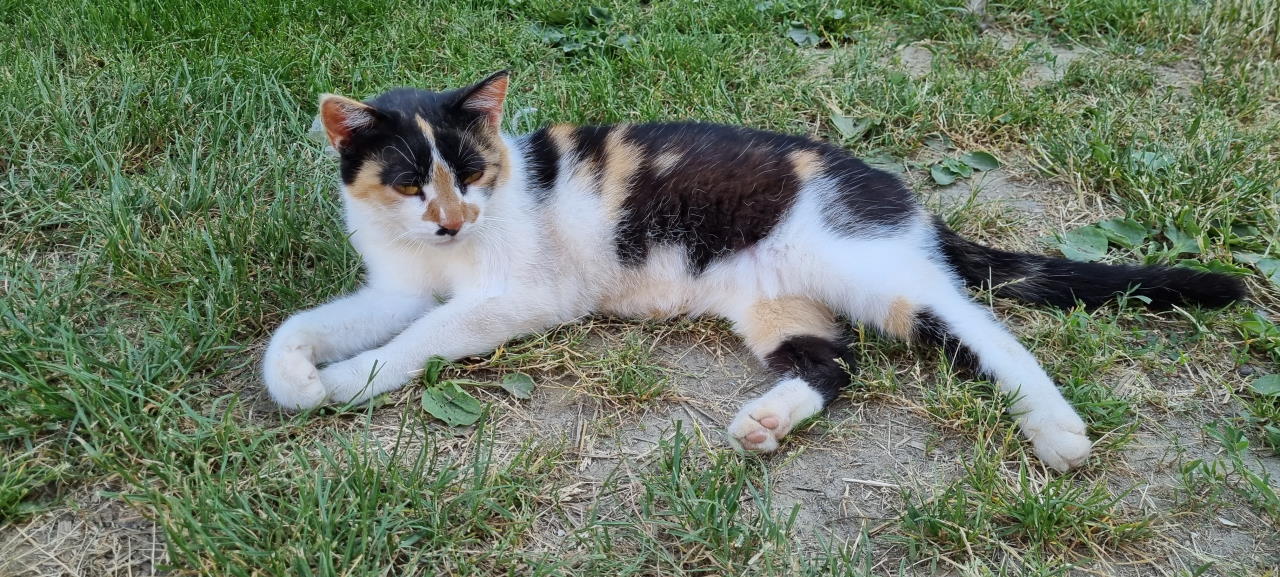
Earlier in development, I created this vaguely cat-shaped head with the texture of my cat Vilko, to use as a status bar face. After all, why would I draw something like this by hand, if Blender could render it in such a vivid likeness of life?
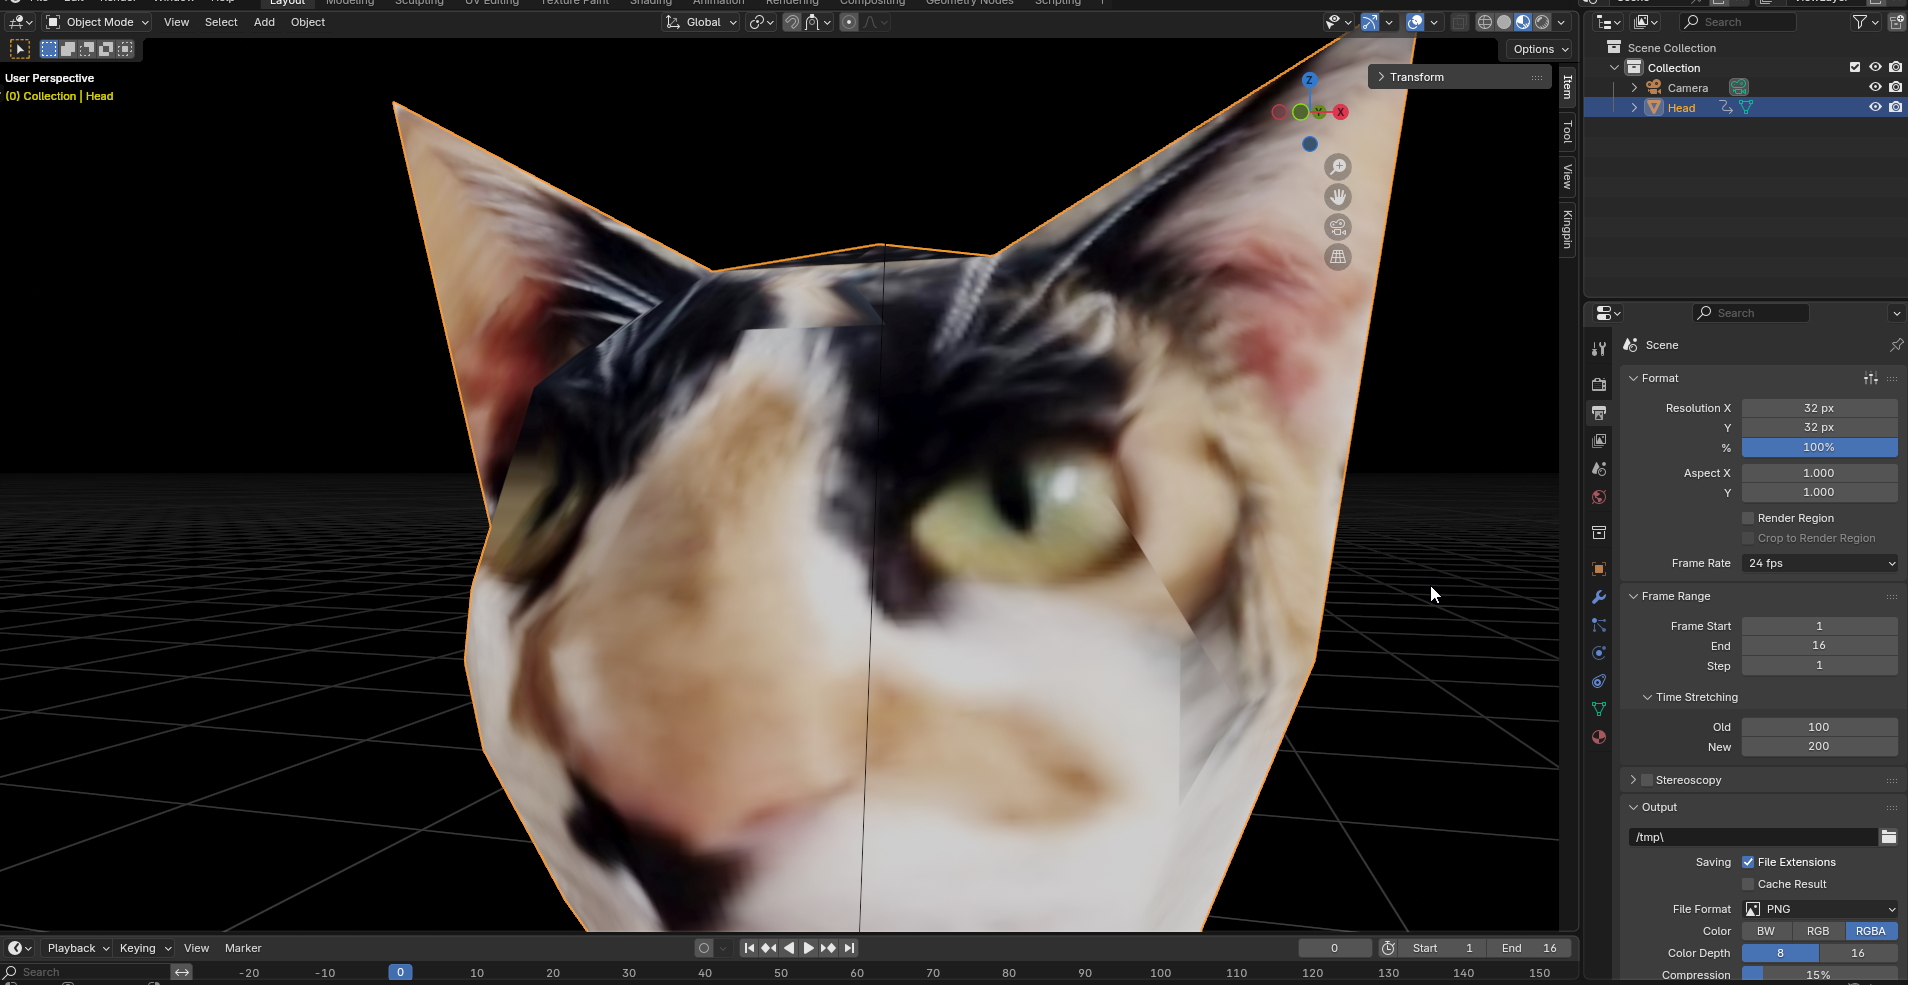
The obvious answer is that it looked lazy and low effort, which it was. It didn’t do a very good job at conveying emotion and it didn’t have soul. When I was collecting feedback on the vibes, this was usually the first thing people pointed out.
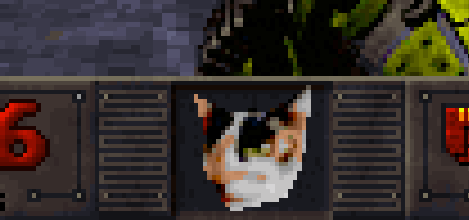
Some things just need to be drawn by hand. I’m no artist, but I’m quite confident that the hand-drawn variant with animations looks far better, and I could never quite reproduce the same result if I animated this thing in Blender. Due to the dimensions of the sprite, every pixel needs to be deliberate, so there’s no room for leaving this work for the Blender renderer.
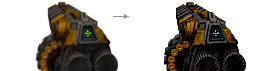
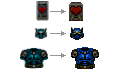
I applied the same logic to most of the pickups, which were previously pre-rendered, but at a scale where Blender’s compositor can’t reliably produce good results. After human touch, their clarity and readability has much improved.
You might think, why simply not increase sprite resolution? The game rasterizer will take care of the scaling, right?
Well, it would work, but the result would look terrible because pixel scale is no longer consistent. At any given row or column on screen, you subconsciously expect the pixels to remain the same size as you move towards or away from them. If pixel scale varied from one sprite to the other, that’s no longer true, and it just looks off. This is probably one of biggest reasons why many asset flippers or low-effort indie games look bad; they slap together assets with different scales that don’t work together at all.
Thus, one unit in Catlantean 3D world is 64 pixels, and every sprite is made in relation to that scale. So if we want a sprite that is as tall as the quarter of a world unit, it must be 64/4=16 pixels tall.
HUD
The HUD and its elements are almost entirely hand-drawn. This includes:
- the status bar at the bottom of the screen
- various transition panels and screens
- fonts
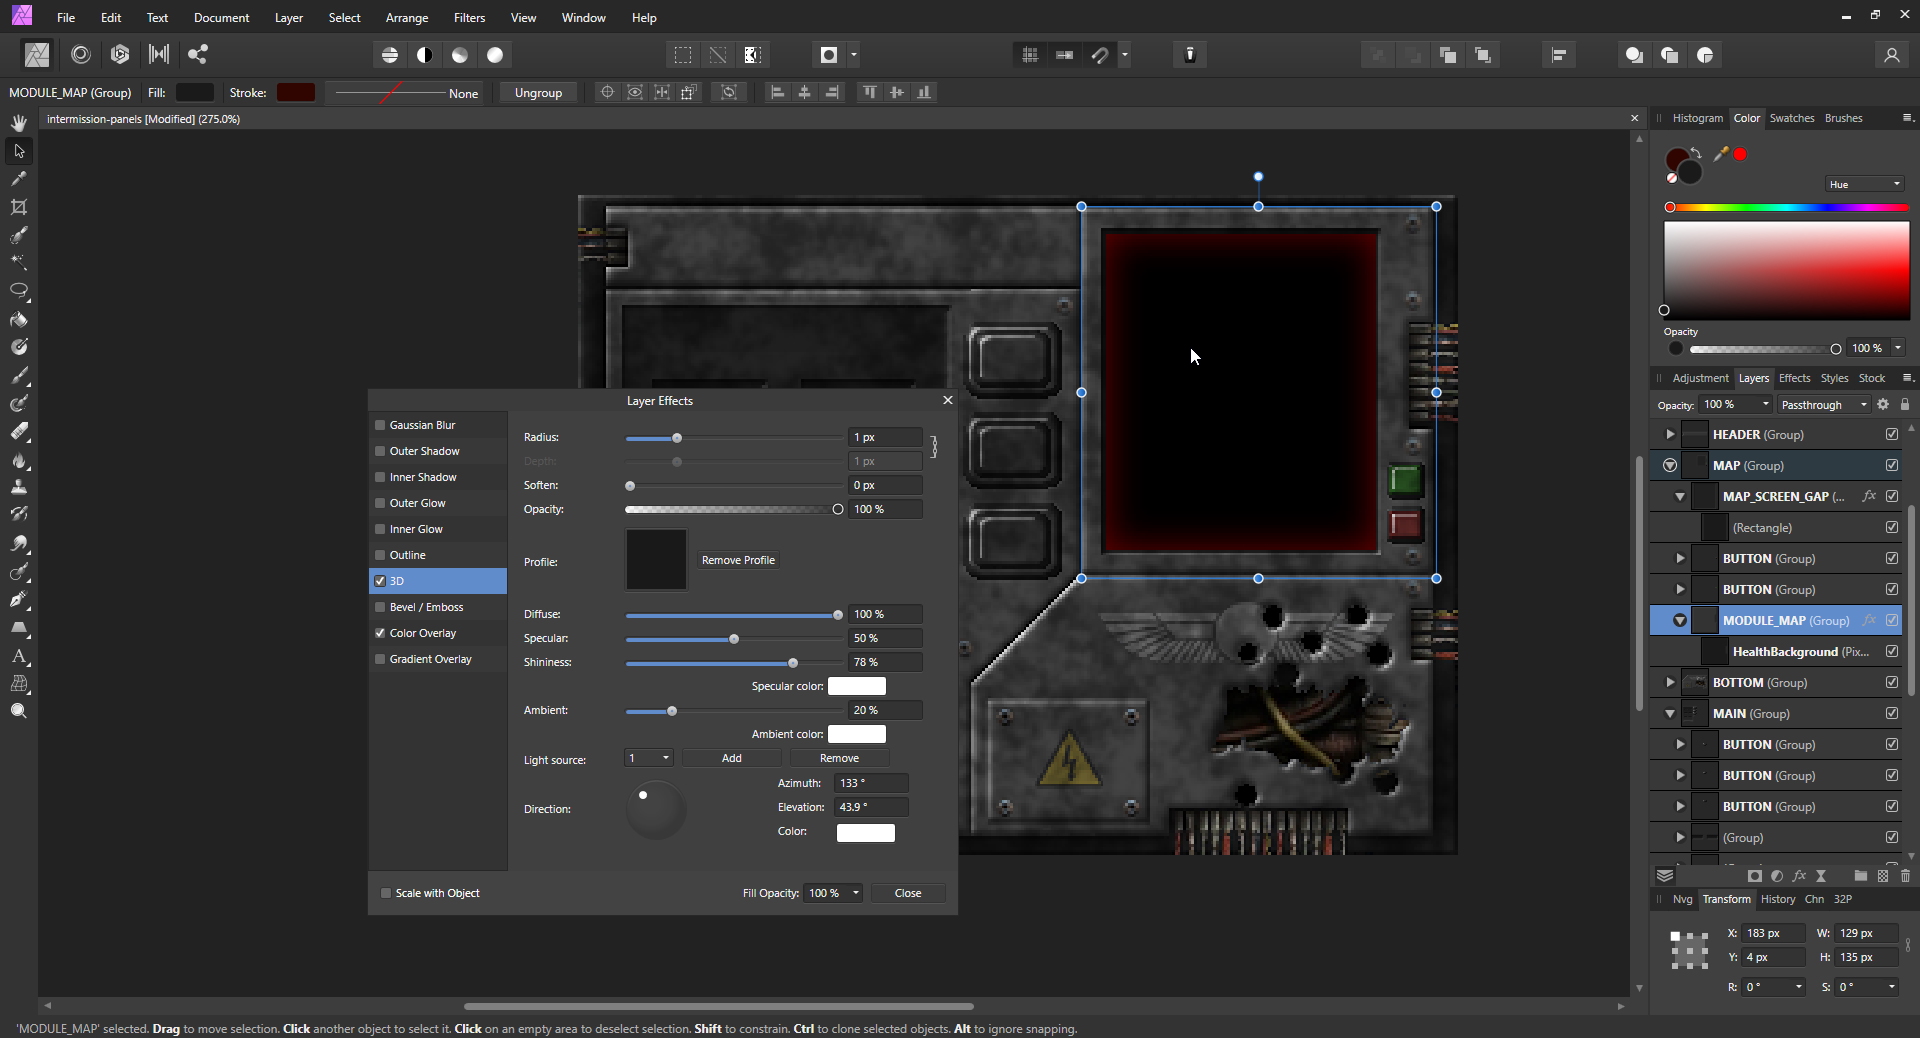
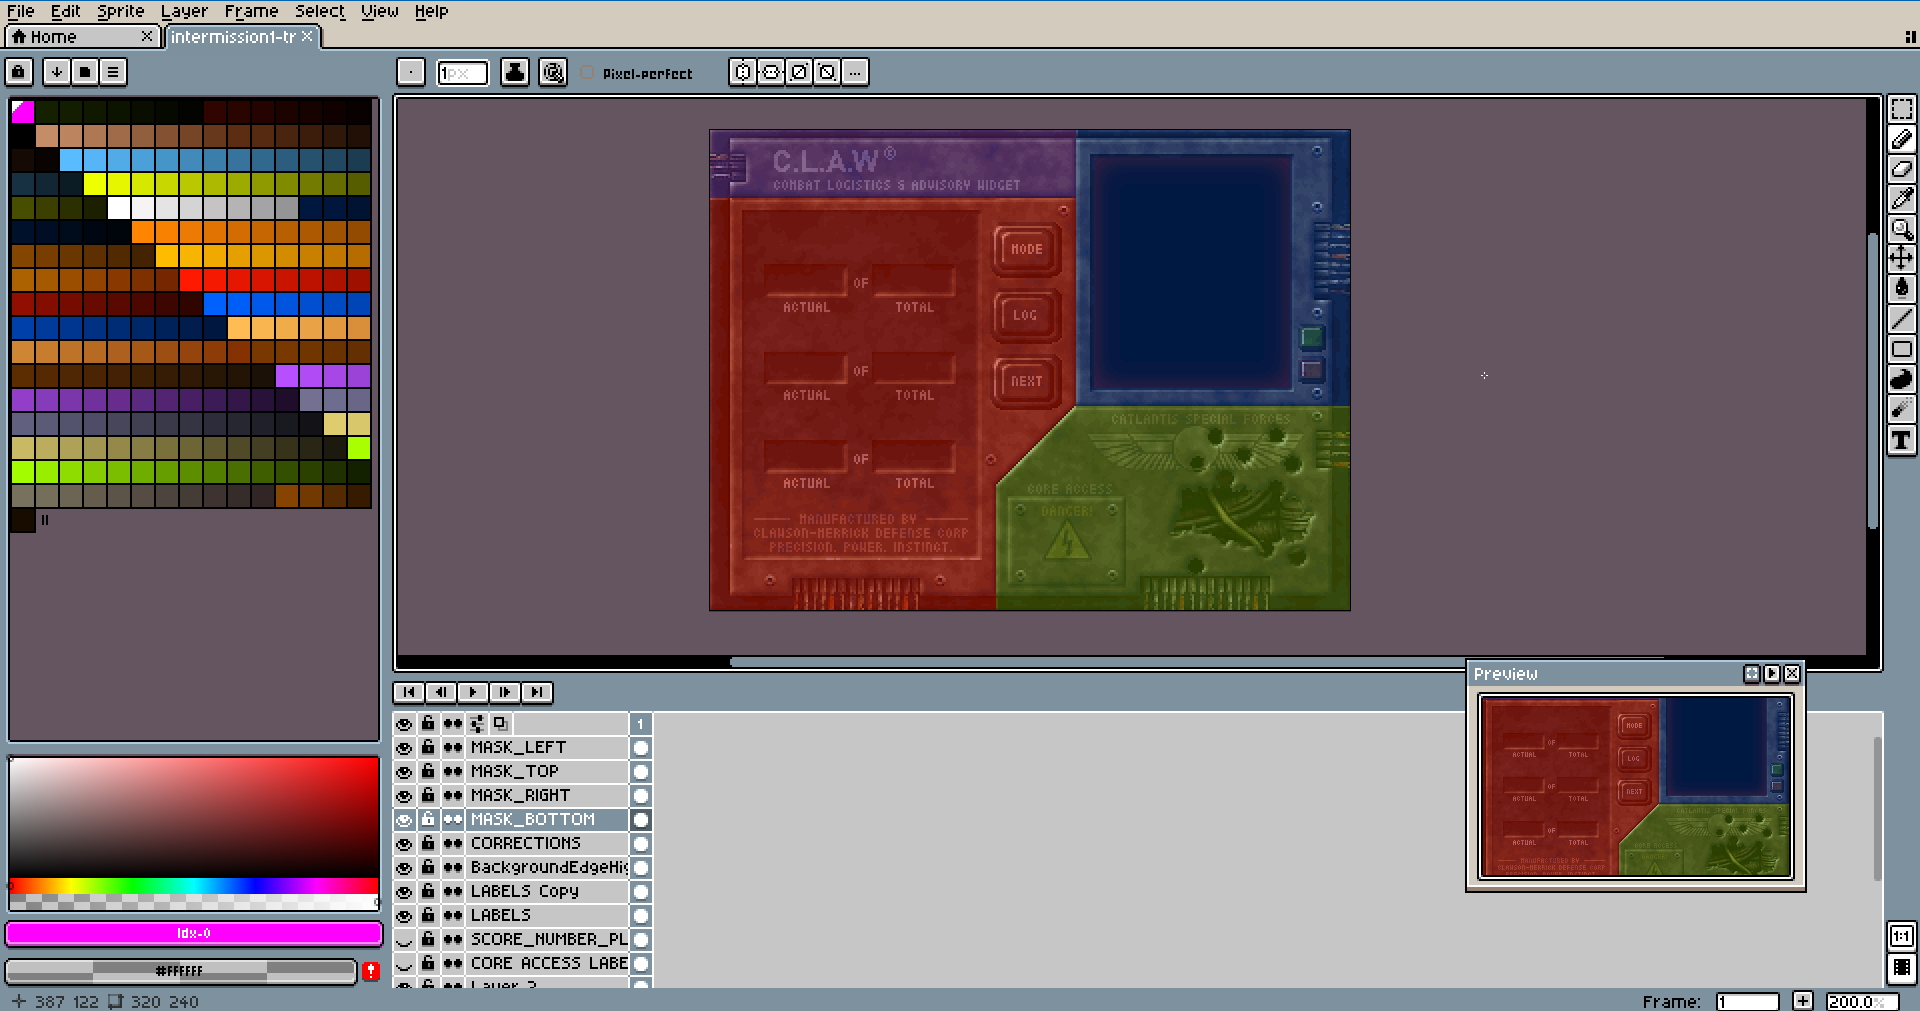
For example, this work-in-progress score screen at the end of the level:
The HUD is hand-drawn in the sense that everything is deliberate and placed by me, but I use Affinity Photo’s layer effects and compositing heavily to get there, rather than painting everything from scratch. These effects include:
- 3D look for otherwise flat surfaces (emboss effects)
- noise generation and overlay for grittier look
- color overlays, blending modes, glow effects
- ease of rearranging HUD elements as I often iterate
I typically work in truecolor first, in Affinity Photo. Notice the layers – most of these elements are literally just single-color rectangles, with special effects and blending magic applied on top.
While Affinity Photo is great, images exported from it contained some strange artifacts most likely related to anti-aliasing, which I couldn’t turn off. Or couldn’t figure out how to turn off consistently. So it’s not great for pixel-correct work, which means I had to do another pass in Aseprite that involved things like:
- pixel perfect text
- cutting artwork into pieces
- paint over element edges for sharper and more clear boundaries
Procedurally Generated Sprites and Textures
Some textures are straightforward or specific enough to draw by hand. But many textures in Catlantean 3D share a common structure: a base material with variations in wear, dirt, and surface detail. Drawing each variant by hand would be tedious and inconsistent, so I wrote Python scripts to generate them.
The generation pipeline takes several inputs:
- a heightmap that defines the surface relief
- this is actually just used to generate the normal map, which is then used to bake in simple lighting and shadows
- a noise map for variation
- a grime map for dirt and wear
- two base colors
- a brightmap for parts that will retain color regardless of other parameters
From these, the script produces a final texture, palette-quantized and ready for the engine. Tweaking a texture then becomes a matter of adjusting parameters rather than repainting pixels, which is a significant time saver when you’re the only person working on this.

Some examples of generated textures:
Gibs
I also have a special pipeline for creating gibbing animations. Gibbing an enemy is typically triggered by applying excessive damage, such as a point-blank shotgun blast or an explosion. To convey impact of such damage, enemies are blasted into bloodied bits:

The pipeline is driven by a Python script. Given a sprite, a palette, and a set of parameters, it produces a series of frames that end up in the game data as an animation. Here’s how it works.
Step 1: Voronoi decomposition
The sprite is partitioned into chunks. K seed pixels are chosen at random from the sprite’s opaque body, and every pixel is assigned to its nearest seed. Each resulting cell becomes one flying piece.

Step 2: Wound bleeding
Chunk borders (pixels adjacent to a different chunk) are marked as wounds at depth zero. A BFS fans inward, assigning increasing depth values. At render time, pixels near the boundary get their color blended toward blood, sampled from a ramp derived from the game palette. The deeper into the chunk, the more the original sprite color is preserved.
The ramp selection from palette is parametrized, so I can also have green or blue “blood” for certain enemies.

Step 3: Physics
Each chunk gets a centroid, a velocity directed away from the sprite center with randomized spread, a spin rate, gravity, and drag. Then, the simulation starts running using these few parameters. There is no collision detection, but chunks simply stop when colliding with the floor. It’s crude, but it’s good enough.
Chunk count, explosion force, gravity, drag, spread, and wound depth are all tunable via parameters, e.g.
"seed": 295312884,
"frames": 20,
"chunks": 48,
"explode": 3,
"gravity": 1.4,
"drag": 0.22,
"spread": 1.15,
"spin": 9,
"woundDepth": 2,
It takes a bit of trial and error to get a seed that looks good, but it’s certainly faster than drawing these animations by hand. The same technique is also used for destructible environment objects (flower pots, barrels, crates, etc).
Like pre-rendered animations, these also don’t live in the repository, but are instead regenerated after repository is checked out. The execution time is negligible.
Pre-rendered Particle Systems
While most particle effects are hand-drawn in Aseprite, some of them are generated and baked the same way as gibs: a Python script runs a simulation and produces a series of PNG frames, which are then quantized to TEX. There is no runtime particle system; everything is pre-baked so that it can be rendered as fast as possible by the software rasterizer.
The word “particle” is a bit misleading here, because the pipeline doesn’t actually simulate particles at all. Instead, each frame is synthesized by computing a radial energy field pixel by pixel, with several independent layers summed together:
- core — a soft disc that expands outward over the animation
- rays — spikes around the core, sharpness and length are configurable, each ray gets individual length jitter from the RNG so the result looks irregular
- ring — an optional expanding shockwave
- noise — value noise multiplied into the total energy to break up the clean shapes into something ragged/irregular
The accumulated energy per pixel is then quantized against the palette ramp specified as script parameter. Each row in the palette is treated as a light-to-dark gradient, simply because I arranged it that way when designing the palette, so the darkening of each pixel is done without any blending or alpha math, just palette index arithmetic. Above a certain threshold, pixels are pushed towards white, so that they give the impression of a white-hot core.
Also, optionally, a small number of sparkles are scattered on top, cross shapes that drift outward and fade over their own lifetime.
The animation supports two modes: one-shot, which ramps up and decays like an explosion or teleport flash, and loop, which samples the noise field along a circular path, so the first and last frames match and the loop is seamless (useful for persistent looping effects like plasma bolts, energy projectiles, etc.)


Map editing started in Tiled, which is a perfectly reasonable tool until you start having very specific needs.
What it lacked was any concept of the things my game actually needed: light level painting per cell, cell flags and properties, which I initially worked around by abusing object properties. On top of that, the workflow required a Python script to convert Tiled’s JSON output into the binary format the engine uses, which is an extra moving part that exists purely to compensate for the mismatch.
There’s also the idea of shipping it to players along with the game. Expecting someone to install Tiled, learn its interface, set up the conversion scripts, and wrangle all of this just to make a map is unreasonable. It would have killed any chance of the editor being something people actually use.
So I wrote my own. It has native support for light level painting, cell flags, and all the entity and property types the game knows about. Development became noticeably more enjoyable because I’m no longer restricted to thinking within Tiled’s limitations, and when the game ships, players get the same editor I used.
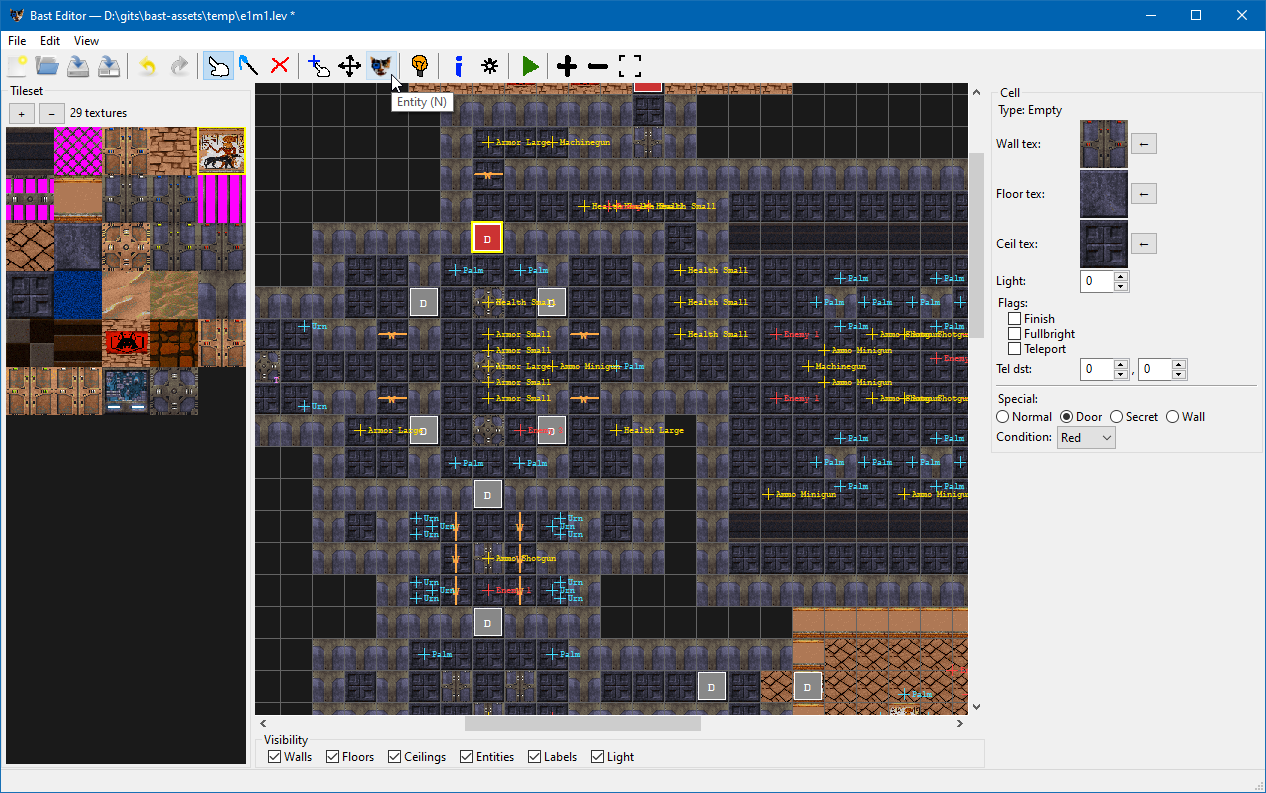
It’s plug and play, you can even launch the level straight from the editor:
Yes, I am aware the toolbar icons are terrible. Which is exactly why I’m keeping them.
The editor is built with wxPython, which turned out to be a decent choice for this kind of tool. It worked better than tkinter (which I tried first), particularly widgets, event handling, layout, it just felt better to work with and the end result looks more native. Iteration was fast, and structuring it around the MVP pattern kept the UI logic cleanly separated from the map data, which matters when you’re frequently changing both (my map format isn’t quite stable just yet). It hits a good balance for a single-developer internal tool that also needs to be shipped to end users.
Not everything in the editor is written in Python. Much of the model relies on my pybast library which is basically Python bindings for engine internals (via pybind), which includes things like:
- reading game data archive
- reading game textures (for display)
- fixed point class for entity coordinates
- serialization
This is mostly to prevent having to re-implement these things in Python where I already have them implemented in C++. As such, the engine and its tooling form a small, tight ecosystem.
I expect to publish Catlantean 3D sometime in Q1 2027. Right now, I’m focusing on level design, adding some more enemies and weapons, and polishing as I go.
I’m aiming for somewhere in $5-$8 price range. I intend to release the game source code on GitHub as open-source, but you’d have to buy the game to get the actual data archive (with graphics, levels, sounds, music, etc.), which I think is fair.
After all, I do need to give the protagonist his fair share.
(Yes, I know it’s a female, but call it convention rooted in dialect.)
Jokes aside, transparency about process is one of the few things that actually builds lasting trust, I think.
Indie games live and die on it in a way AAA simply doesn’t, because that market has demonstrated it will accept whatever it’s given. Indie doesn’t have that luxury. The audience is smaller, but they’re also more willing to follow a project, root for it, and tell other people about it when they feel like they’re genuinely in on the process rather than being marketed at.
Showing your work is the most honest thing you can do, and I think people can tell when someone actually cares about what they’re making.
There will be more to come.
Thanks for reading!
If you enjoyed this article, feel free to follow me on social media.


